

Are you considering adding plant material to your property this year? Here are some tips to ensure you set your plants up for success and plant properly the first time.
What Plants Grow Best in Your Area?
Not every plant will thrive in every location. Below is a helpful link to help you determine what plants would be best for your area which allows for several filtering options:
- Plant Type
- Light Levels
- Water Needs
- Maintenance Needs
- Seasons of Interest
- Hardiness Zones (with Map)
- Heat Zones (with Map)
- Climate Zones
You can search for native plants by region or by plant names: https://www.gardenia.net/plant-finder
Once you have selected your plants, consider the following steps.
How’s Your Soil?
Growing healthy plants begins with having healthy soil. It is important to prep the area before planting. Remove any debris, and consider adding topsoil as needed. If your soil is too thick and sticky, or too sandy, it will not yield the results you desire.
Prepping the Hole
A common mistake people make when planting is that they dig the hole too deep. It is better to make the hole two times wider than the root mass, and deep enough so the root ball is about one inch above the ground. It is also a good idea to ensure the sides of the hole are not smooth. You can use a garden tool to score the sides of the hole. This will allow the roots to grow more easily in the native soil. Add some rich soil to the base of the hole before placing the plant inside.
Prepping the Plant
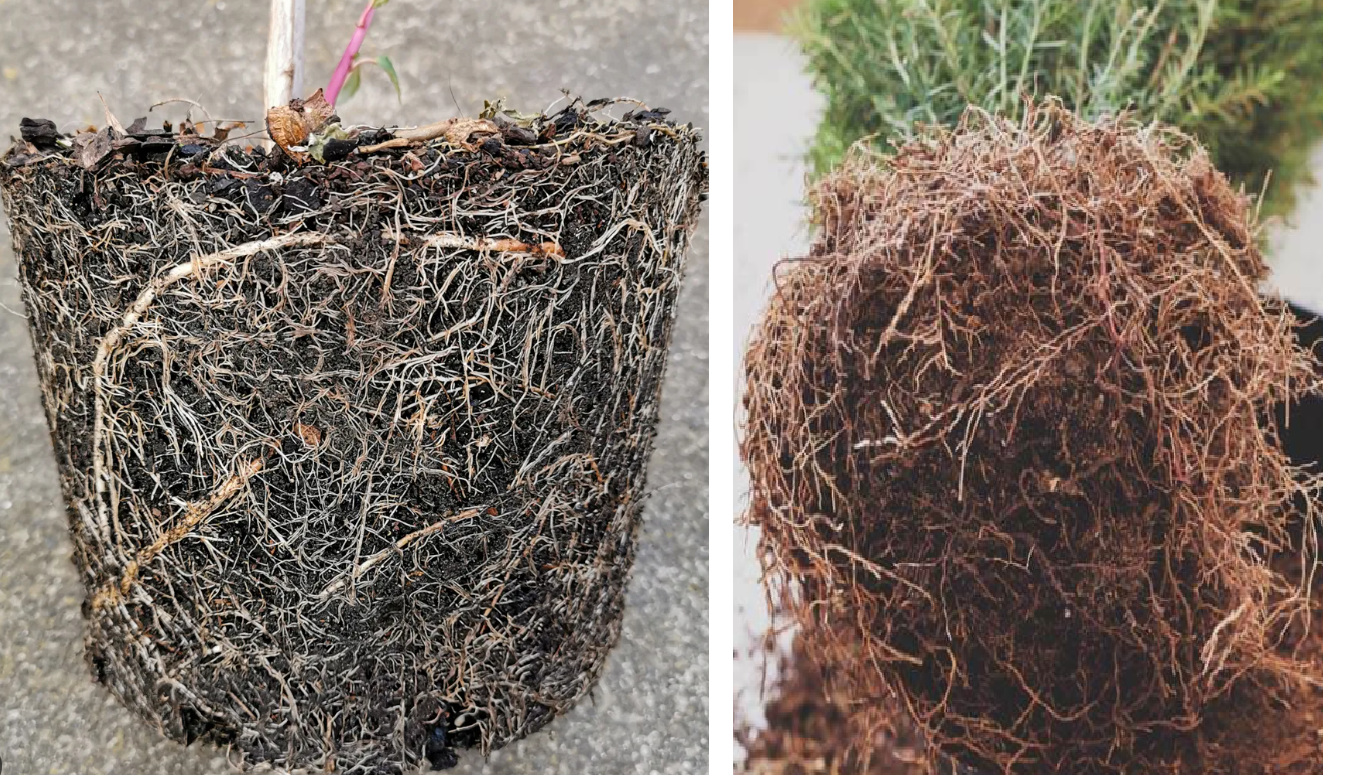
Before placing the plant in your hole, check to see if the roots are circling and clinging to the root ball. If so, you will want to loosen the roots a bit so that they will grow outward into the soil. Do so carefully so you do not damage the base. Check out the before and after pictures below; “Before” on the Left and “After” on the Right.
Placing the Plant
After you have dug your hole and added fresh soil in the bottom of the hole, place your plant in the hole. As a reminder, the top of the root ball should be approximately one inch above the surrounding soil. If it is too low, pull the plant out and correct the depth. If everything looks good, you can start backfilling the soil. As you do so, press the soil down to collapse air pockets in the soil but be careful not to press too hard as you don’t want the soil to be compacted. A helpful tip once you have set your plant is to make a small well on the top of the soil near the root area. This will help direct the water straight to the root system and promote growth!
Water Water Water!
Water is one of the most critical steps to the planting process. Once you have completed the planting, water the plant well to ensure the soil around the plant is very moist. Mulch is a good addition to the top of your plant as it will help the soil to retain moisture. Adding two to three inches of mulch is sufficient. Once you add the mulch, water one more time. Be sure to water your plant(s) regularly once planted as you do not want the soil to dry out. This is critical in the first few weeks, and still important for the first year to allow your plants to grow strong roots! Be careful not to oversaturate your plants with water. You don’t want to drown the soil, just keep the soil moist!
Don’t Hesitate to Ask Questions
Today, the internet is a great resource to answer almost any question you might have, but sometimes, speaking to someone who knows what they’re talking about is easier than using a search engine and having to research and read. Streamline Landscaping is always available to answer your questions and ready to help when you need it! Call 708-296-4081.